|
|
|
Viewing the 'Recipes' Category
May 9th, 2024 at 12:36 am
8 oz room temperature salted butter (do not microwave)
2 to 3 tsp granulated garlic (not powder), adjust to taste
1 to 2 tbsp dried Italian seasoning (or at least basil, oregano, and parsley) adjust to taste
Put ingredients into a mixing bowl and mix with a whisk. You can use a stand mixer or hand mixer on 2 or low, or just a regular old hand whisk, but if you do use a regular whisk I advise using a small one with close set tines and shake it out every few strokes. I do not recommend blenders as they can melt the butter. Mix until smooth and all ingredients are incorporated. It doesn't take long. Taste and adjust seasonings to your liking. We like it at 3 tsp garlic and 2 tbsp Italian seasoning, but not everyone does.
Transfer to a bowl, using a spatula to scrape out the whisk and mixing bowl. You can leave the butter out, covered, for a week if you will use it in that time, otherwise keep it in the fridge and it will last a long time. Just take it out an hour before you need to use it for spreading.
It's good spread on naan bread and if you have a kid who doesn't like pizza sauce, it makes a good replacement for that when you make pizza, too, not just on pasta.
Posted in
Recipes
|
4 Comments »
November 30th, 2021 at 06:16 am
This was an excellent food year for Thanksgiving and we had a lot of turkey leftover. I picked all the meat off the bones the night of Thanksgiving and we ate just regular leftovers for a couple of nights running and then last night DH cubed up the rest of the meat and I made turkey casserole for dinner tonight, plus two and a half pans for the freezer.
I make a simple to put together casserole. With the amount of turkey I had left (14 cups) I mixed in 4 cans of cream of chicken soup and 2 cans of cream of cauliflower soup. I used the Pacific brand, since it is gluten free, but any works and you can sub cream of celery or mushroom for the cauliflower or just use a second can of cream of chicken. I used a large carton of sour cream and then the leftover equivalent of one can (2 cups) of corn and 2 cans (4 cups) of green beans. Then I added 2 cups of romano cheese and 2 cups of colby jack cheese, because that is what I had. You can vary the cheese but some of it should be colby or cheddar.
Then I put that all in the pans and added a layer of leftover mashed potatoes on top. I had to mix some milk into the mashed potatoes to get them back to a soft, spreadable consistency. So a thawed one just gets cooked for 25 minutes at 350 F and then sprinkle cheese on top and cook another 5 minutes. You can do it with tater tots if you don't have mashed potatoes, but then you have to cook it for as long as the tater tots say they need to be cooked for on their packaging and at their temperature. We had to mix up instant potatoes for the other 2 and a half pans. Once finished, cover with foil and write instruction on top with a shapie.
Cooking from the freezer you leave the foil on for 1 hour, remove foil and cook for 1 hour, adding the cheese on top for the last five minutes of cooking. Easy peasy. We have also frozen the remaining lemon bars and pumpkin cheese cake. So other than the bones, which I will make into broth tomorrow and can, and a little bit of stuffing that will get eaten tonight, there are no more leftovers in my fridge, and nothing has gone to waste. In a few weeks when we are no longer sick of turkey I can pop one out and be good to go.
For a single pan version of this you will need:
4 cups of leftover chopped turkey or chicken
1 can cream of cauliflower soup
1 can cream of chicken soup
1/3 of a large carton of sour cream
3 cups of cheese with some of it being cheddar or colby
1 cup of canned corn
2 cups of canned green beans
Additional cheese for topping
Enough leftover or instant potatoes to cover the top of the 9 x 13 pan
If you have them you can throw in some green onions to your taste.
Leftover stuffing could go in this, too, but we didn't have enough. Corn and beans can be left out and served on the side for picky eaters.
Posted in
Recipes
|
2 Comments »
November 3rd, 2021 at 12:52 am
LAL wanted the recipes from my last meal plan, so I am going to try to get them up as I can. I was hoping to sit down and do them all at once, but I just don't know that I have the werewithal to do that right now, so I'll get them up as I can. This recipe is versatile and amounts depend on how much spaghetti you want to use. You said in your post that you want meals big enough to be eaten two days in a row and this will do that.
Now I usually do a pound and a half of spaghetti to get us a meal for one night and leftovers for two lunches. If you want enough for two meals, you'll likely need to do two pounds for a family of 4 or two and a half for a family of 5. These amounts would differ if you have young kids.
So for every pound of spaghetti you cook you need one pound of ground meat, 1 large diced yellow onion, 2 tbsp minced garlic (from a jar is fine) 1 pint of diced tomatoes, 2 pints of tomato sauce, 1 6 oz can of tomato paste, onion powder, garlic powder, salt, pepper, and Italian seasoning.
Start by browning your ground meat on medium heat (350°F). Sprinkle it with onion powder, garlic powder, salt, pepper, and 1 tbsp of Italian seasoning or to taste. You don't need to cook it all the way through, just until it is no longer visibly pink. It will finish cooking in the sauce. Right now you are just getting that nice brown flavor. Remove the ground meat from the pan and drain the fat. Add some olive oil to a large pot and start cooking your onions. Meanwhile, drain your diced tomatoes. The onions will take about 15 minutes to saute to the right consistency. Some browning is good. After the 15 minutes is up, get your water for the spaghetti ready. Add enough salt to the water to make it taste like the sea, and turn it on high. Cover with a lid. Add spaghetti when it comes to a full boil and cook according to package directions.
Meanwhile add the garlic to the onions and saute for 1 minute, stirring constantly so garlic does not burn, then add the tomatoes and cook for 5 minutes. Add tomato sauce, onion powder, garlic powder, salt, pepper, and Italian seasoning to taste (no this is not too much seasoning) and once stirred in add tomato paste. Make sure the tomato paste is absorbed into the sauce and doesn't stay in clumps. You may have to press it out flat against the bottom of the pan and stir it into the sauce several times. Once all the clumps are out, add the meat into the sauce. Turn down to a simmer. Put a lid on your pot as the sauce will spit like a mud pot at Yellowstone. Stir every couple of minutes for ten minutes, then taste your sauce and do your final adjustment on seasonings.
Drain your spaghetti and put onto plates, then top with the sauce. Serve with a salad or other green vegetable.
Stir every couple of minutes.
Posted in
Recipes
|
1 Comments »
June 10th, 2020 at 04:13 am
Mumof2 wanted to know how I make homemade ice cream without an ice cream machine and I just put up a video today of how I make strawberry ice cream on my youtube channel. I think I am going to do a whole ice cream series of no machine ice cream through the summer. There are lots of yummy flavors that I want to do as we go through the summer season. Text is https://www.youtube.com/watch?v=3N-1j8uQ4I8 and Link is https://www.youtube.com/watch?v=3N-1j8uQ4I8
I harvested more radishes from the garden today. This brings my count to:
Purple Radishes--4
Cherrybelle Radishes--1
Icicle Radishes--11
The purple radishes are quite large, I can only hold 3 in my hand, and the icicle radishes are quite a bit bigger than that. So far that makes 3 lbs of radishes. Not to mention all the radish greens, which I am eating some of and the rabbits are eating some of. All told, in organic radishes I've harvested about $10 worth if you go based on size, where one icicle radish would be equivalent to 5 regular red radishes and a purple radish would be around 2.5 regular radishes. One bunch of organic radishes is $1.29 where I live.
I made chicken taquitos for dinner tonight and they were fantastic. There were leftovers so I froze them. I baked the taquitos, but the frozen ones can just go into the deep fat fryer next time or if someone wants a quick lunch they can do a few. The recipe was very easy and I made a double batch.
Usually I want to tweak a recipe, but this came out good the first try. Although I did use garlic and fine herbs cream cheese instead of plain, so I guess I did tweak it. And I will probably add more cilantro and green onions next time, just because I couldn't really taste the small amount that was there so I guess I will tweak it some more. Oh, that's just the professional cook in me coming out. You can take the girl out of the restaurant, but... Anyway, the recipe I used is here if you are interested: Text is https://ourbestbites.com/baked-creamy-chicken-taquitos// and Link is https://ourbestbites.com/baked-creamy-chicken-taquitos//
It rained on and off all day, so other than harvesting radishes and weeding part of the radish bed, I didn't really do any gardening. If it had been dry I would have weeded the rest of the radishes and the second strawberry bed.
I did order some more radish, carrot, and onion seeds for bunching onions (scallions) which should hopefully be here in 7 to 10 business days according to Johnny's Selected Seeds. By the time I made it to a nursery, there were no bunching onions available. They sold out fast once they were allowed to be open. Lots of new gardeners this year thanks to Covid-19. Next year I will try to be more on the ball and plant my own starts. This year I had what was likely Covid-19 at seed starting time.
I didn't spend any money today and I am trying not to peak at retirement again this week. I am so looking forward to Friday and paying off that debt. 3 days to go.
Posted in
Gardening Organically,
Recipes
|
2 Comments »
March 15th, 2020 at 05:15 am
We rescheduled our vacation for mid-May with the idea that it might have to be moved again, but hopefully not. DH is still taking the week off, though. We decided not to go to the library. We can still check out digital books while it is shut down. And I do have a few unread free books on my Kindle app as well as a couple books I have not read yet.
My MIL gave her granddaughter half her toilet paper, not realizing she would not be able to get more and so she was left with only 6 rolls. DH kept an eye out as he was doing several small errands today. Most places were empty, but Walgreens had 12 9 packs of Charmin, so he picked up 2 for his mother. There was a limit of 4.
While I have two and a half cases of TP for 4 people (Mom has her own), I went ahead and ordered 48 brown wash cloths and 4 squeeze bottles for my family. While I hope it doesn't come to it, we can fill the squeeze bottles with warm water and use that to wash off and the wash cloths to dry off with. We also have a case of paper towels and a couple boxes of baby wipes. We'll see how things progress. I also have two buckets with lids, one for each bathroom, that used washcloths can be stored in until we have enough to wash or run out. If it doesn't come down to that we'll have lots of brown wash cloths we can use for something else, like garage rags or if never used at all, kitchen use.
There are murmurings that we may not be allowed to travel domestically in Washington state. I saw one source saying that the DoD has started recommending no domestic travel for the military and their families here. I think civilians will be next. I have not found a second source to confirm it, though. I don't know if travel restrictions will mean staying in your house or just not leaving your city. I'm looking to see if I can find more out on it, but there might not be until tomorrow.
Last night I thawed out two packages of beef soup bones and made bone broth in the Instant Pot and today I am making a beef soup with the meat that fell off the bones, 4 stalks of celery, 1 yellow onion, 1 head of minced garlic, 4 red potatoes and 3 Russet potatoes that were starting to sprout a bit and needed using up. I dug out the sprouts and they were perfectly edible.
I seasoned it with ginger (for the health benefits), onion powder, garlic powder, salt, and pepper and threw a couple sprigs of thyme on top (also for the health benefits) that I fished out before serving. The flavor was fantastic. Best beef soup I've ever made. I would have used carrots, but my daughter doesn't like them cooked. I am freezing the extra, which was 3 quarts of soup, in some old soup takeout containers from the Polynesian restaurant.
Tomorrow I will make turkey soup, but will start the broth off tonight like I did with the beef. It will be the same but with a couple of white carrots, which tend to be the least sweet, and I'll add some poultry seasoning and sage (for the health benefits and the flavor), too, but leave out the ginger. DD doesn't always get her way about the carrots, because the rest of us like them. Turkey isn't as sweet as beef though and can use it.
We have a lot more beef soup bones and some lamb soup bones in the freezer in the garage. I think we will likely be on a soup kick for a while. Just because it is the most soothing food when you don't feel well and it seems to open up the sinuses to hover over a bowl of steaming brothy goodness.
Soup will definitely make the food we have stretch as it is quite filling and a big pot feeds us one night and the rest goes into the freezer to feed us for two more meals. Although DH will supplement with more protein. The rest of us don't tend to need to. We had leftover pot roast so that worked out.
I have gotten a request for ham and pinto bean soup which I have never made before, I really don't like beans, but both kids like it as their grandmother used to make it before she went off pork. I'll have to ask her if she does anything special. DD hasn't eaten beans in a couple of years and decided she wanted to test them again. They bothered her badly after her gall bladder came out. I'm not sure if there are any dry beans left in the stores, though, and maybe not even any canned, so it may be a moot point until after all this is over.
Not really much else going on. Just standing at the edge and waiting to see who falls off.
Posted in
Emergency Living and Preperations,
When Life Happens,
Recipes
|
4 Comments »
January 9th, 2019 at 04:28 am
I took DD to the dentist today. She had to get the webbing clipped on that part of your mouth where the lower lip connects to the gum. It was starting to pull down the gum line on her two lower front teeth too far. It could have eventually exposed the roots of the teeth and she might have lost them due to them not being stable anymore. It was just a quick snip and a couple of stitches.
I am not sure how much it will cost us. Probably $50 for the co-pay, but they didn't collect anything while we were there. I wish our previous dentist had brought this up before. The new guy seems a little more on the ball. I mean, when he pointed it out to me, you could really see where the damage was being caused, it is an obvious thing that a dentist should have noticed before this. Unless maybe it wasn't as obvious and just got really bad in the last year.
I did actually break my no take out rule. I bought my daughter two milkshakes because she wasn't allowed to eat solids for the rest of the day and she wanted something cold to numb it. I really didn't want to go to the grocery store because it was raining hard, so we went to DQ.
I also spent $27.33 on prescriptions today, including a numbing mouth wash from the dentist for her. That came out of the medical account, though.
We still have not heard anything from the gyno's surgery scheduler. Hopefully we will hear from them this week. I know the doctor wasn't in her office for the last two weeks, but everyone was supposed to be back on Monday. The insurance company was probably pretty much closed down between Christmas and New Year's as well. If I don't hear from them by Friday I'll give a call on Monday.
I am still waiting to get a bill from DS's sleep study. It looks like it will be around $400 based on what the insurance company sent me for what they covered, but I'd like to get the bill so that it can be taken care of. The insurance statement only came on Monday. Everyone is behind because of the holidays, I think.
Mom called her insurance company today and has a claim number we can use. We will take the truck in soon to get an estimate and then schedule repairs. Fortunately, the damage is just cosmetic except for the bumper and while the license plate is dented in badly, it is still readable. We will leave that until we get new plates. Washington state requires new license plate numbers every 5 years (and they wonder why we are running out of numbers on our plates. They used to just be six digits and now they are seven because of this rule. Well, actually, we better make sure a new plate would even be attachable. I'll mention that to DH so he can mention it to the repair guy.
I did change my meal plan tonight since DD can't eat solids, to penné pasta with chicken sausage, since she can't eat the chicken sausage or tomatoes. I have a ton of sausage in the freezer that used to be something she could eat, but she can't anymore.
Oh, Alliecat79, this was a super easy Instant Pot meal. Just take two pints of diced tomatoes with their juice and add them to your pot, then dump in a box of penné pasta, then put in two jars of spaghetti sauce covering the pasta. Put an inch of water in each jar, put the lid on, shake up, and then dump the contents into the pot. Between that and the tomato juice there is enough liquid to make the steam so adding more is not necessary. Cut up some sausage links and put on top. On the manual setting, set the time for 12 minutes. Do a quick release when done and then stir it all up. That's it. (Sometimes I throw in a couple handfuls of frozen zucchini, too). Oh, and make sure you spray the liner pot with olive oil before you start. It makes clean up much easier.
Posted in
Meal Planning,
Medical Issues and Spending,
Recipes
|
2 Comments »
September 2nd, 2018 at 04:28 am
I made tomato soup from scratch for the first time today. I had a big glut of tomatoes from the garden and what was left over from what Mom brought home from eastern Washington. I made it in the 8 quart Instant Pot and it was really good. I don't even like tomato soup and I liked this soup. I thought I'd pass along what I did.
Ingredients:
1 small yellow onion, diced small
2 stalks of celery, diced small
1 cup shredded carrots
1/2 cup red bell pepper, diced small
2 heaping tbsp minced garlic
salt
pepper
Italian seasoning
Tomatoes cut into wedges
2 cups broth
I started by putting the pot onto saute mode and sauteed the onions, celery, carrots, and bell peppers for 3 minutes, added a few shakes of salt, a few shakes of pepper, and 8 shakes of Italian seasoning and stirred. Then I sauteed for 3 more minutes and added the garlic, sauteeing for 30 seconds more.
Turn off the saute feature and add enough tomatoes to go up to the fill line. This was probably about 10 pounds of tomatoes. Add two cups of broth. I used chicken broth. Add one tbsp of salt and 1 tsp of pepper.
Put on the lid and set it to sealing. Select the stew button (meat/stew on some models) and bring the timer to 50 minutes. Cook. When the time is up do a quick release of the pressure. Remove the lid with the steam going away from you.
Use an immersion blender to blend the tomatoes up. Taste and adjust seasoning. I we ended up adding two more tsp of salt and 1/2 a tsp of pepper, and 1 more tbsp of Italian seasoning.
Ladle into pint jars and pressure can for 20 minutes. This makes 8 pints. Or you can can half, like I did and to the remaining soup add 1/2 cup of milk and 2 cups of fresh basil, blending again until smooth.
Both versions tasted really good to me and the kids and DH all loved it. I am happy, because now I can can up more soup when I get enough tomatoes. As they get ripe in the garden, I can core them and cut them up and then throw them in the freezer until I get enough. That way, I don't have to leave them setting out for the fruit flies to hatch out on. I have already canned all the diced tomatoes and wedges that I am going to this summer, so this will use up the rest of what I produce really easily.
As a side note, I canned the soup in the 8 quart Power Cooker XL electric pressure cooker. It has a canning feature. I have been very happy with it. I have only used it to can broth before, but it has always worked great. I like not having to baby-sit the process and it works well for small batches like this, where I won't have to drag out the big canner.
It is nice to have 2 electric pressure cookers, too. While I prefer the Instant Pot, it does not have the canning feature. Once I get a new inner pot for the XL, I will be much happier. The IP's stainless steel inner pot fits in the XL, so I will order one of those. The non-stick coating that came on the XL scratched off withing the first 2 months, so I only use pot-in-pot cooking or the canning feature on that one. With the other kind of inner pot, I will be able to fully use it again.
Posted in
Recipes
|
1 Comments »
June 22nd, 2018 at 01:46 am
The weather broke today and I am very happy. It was a cool 66 degrees F, which is so much better than 88 and 90. It was lightly overcast as well, so I didn't have to wear sunglasses while driving. I really don't like to because I have to wear the kind that go over my glasses, but there are certain times when I absolutely must. I've tried having prescription sunglasses in the past, but it doesn't block the peripheral vision from strong sun and I need that since the retinal tear as I am much more sensitive to sunlight now.
Speaking of glasses I have decided to take some of the overtime money and get new ones. These ones are just giving me such bad headaches. My eye doctor thinks they last people screwed up the prescription. He says there is too much difference between the one previous to it and the new one in the opposite direction it is in now, for the last one to have been done properly. He thinks they must have wrote it down incorrectly.
We had to use that place the last time because it was the only one the insurance we had at the time would pay for. I should have just gone where I wanted and just had the glasses made there. Although I won't have them made there again. Since we don't have vision insurance currently, I will just go where I want to, which is a local shop that is not part of a chain and isn't in a mall or strip mall.
I am figuring that it will cost close to $500 for my prescription, which means about half the amount I had earmarked for debt this week, but hopefully I'll find a more inexpensive set of frames I like and I can come in closer to $400. I thought I'd saved the frames from the previous pair that I really liked, but I can't find them and think they may have accidentally gotten recycled when we did a bunch of old glasses. I did find the pair before that, but those ones are way too small to support my current prescription.
My mother has offered to teach DS to drive. She has the time and doesn't want us to have to pay for a class. So that will work out nicely. At least it will if she doesn't freak him out too much. She was a good teacher back when she taught me, but these days she isn't as fast with the reflexes. Still, if they go out when it isn't a busy time of day it should be fine.
There isn't much going on around here. I made tzatziki today because tomorrow I am going to be trying an Instant Pot recipe for Chicken Shawarma. I will also be making my own pita bread tomorrow. It looks fairly straightforward. I figure if I can master English muffins, hot dog buns, and French bread, pita bread should be a snap.
If you want to see how I made it, it is on my youtube channel here: Text is https://youtu.be/XyvHtZtzuNg and Link is https://youtu.be/XyvHtZtzuNg
Posted in
Medical Issues and Spending,
Recipes
|
2 Comments »
May 27th, 2018 at 12:00 am
One of the things Amy Dazcyzan recommends in the Tightwad Gazette books is to make a price book. I have never done this and I really never considered doing it before today, but it would have really come in handy these last two weeks when making up the grocery list, so today I sat down with as many receipts as I could still find and started making a spreadsheet with the prices of everything that would fall under either groceries or household expenses.
This way when I make up my grocery list I will know approximately how much everything costs so I can make sure I am coming in under budget, give or take a sale or two. I will also know which store has the better price on what, though I pretty much have that in my head already. It will also let me know if I need to bump a staples purchase to a different week or if I have enough in the household budget for whatever purchase I want to make that week.
I always thought it would be a tedious process, and it probably would be if I were doing it by hand, but typing it into a spreadsheet is easy enough. I put everything in alphabetical order, and then if I need to add anything new I can just insert a sheet row in the appropriate spot and still keep it in order. I do love modern technology.
I think it may be time for me to put the Tightwad Gazette books on hold again at the library. I am in a way different place than when I've read them each time before, much more heavily focused on the food budget and budgeting more tightly in general. I've learned something new with each read and I think that was because I was open to something different each time.
Oh, also, I am going to venture into cooking with lentils. I am looking for some good recipes that do not have beef, lamb, or pork in them. Most of them seem to be made with ham and she can't eat that much fat. Chicken or turkey or fish are okay and so is vegetarian. Lentils are a protein my daughter can eat (and likes) without fear of it upsetting her gall bladder, or in the aftermath of having it taken out. I just found out that Thrive Life has lentils, too, so I added a #10 can to my monthly order. If she likes those ones, then I'll get a bucket.
Posted in
Cutting Expenses,
Grocery Shopping,
Recipes
|
11 Comments »
March 21st, 2018 at 01:13 am
Laura was asking about frugal meals. For breakfast we eat a lot of egg variations, because eggs are still the cheapest thing we can buy, really. Or get for free from our ducks.
Right now I'm on a baked omelet kick, where I just spray a mini-meatloaf tin and add two beaten eggs, 3 tbsp of vegetables, 1 to 3 tbsp of cheese and 2 tbsp of meat. I use up a lot of leftover veg this way. You can make them in large size muffin tins (not cupcake size) if you are making multiples.
Bake at 350 degrees F for 20 to 30 minutes. It really depends on your oven for the time. In my Nuwave it takes 20 minutes and in my gas oven it takes 30 minutes. I imagine an electric oven is somewhere in between. Stick a toothpick in the center and check that it comes out clean and that is when it is done.
My favorite variations:
2 eggs, 3 tbsp pico de gallo, 2 tbsp sausage, 1 tbsp sharp cheddar, salt and pepper
2 eggs, 3 tbsp chopped broccoli and cauliflower, 2 tbsp diced ham, 1 tbsp sharp cheddar, salt, and pepper
2 eggs, 1 tbsp chopped tomato, 1 tbsp diced green bell pepper, 1 tbsp diced onion, 2 tbsp diced ham, 1 tsp Italian seasoning, salt, and pepper
2 eggs, 1 diced green onion, 2 tbsp leftover or canned salmon or tuna, 2 tbsp Parmesan cheese, salt, and pepper
2 eggs, 3 tbsp leftover taco meat, 2 tbsp Mexi-blend cheese
2 eggs, 2 tbsp ground beef seasoned with garlic powder, onion powder, salt, and pepper, 1 tbsp diced Anaheim chili pepper, 1 tbsp diced red bell pepper, 1 tbsp diced red onion, salt and pepper
To make this easier on me, I will dice up a bunch of ham or cook a pound of sausage or ground beef and then flash freeze them flat on a cookie sheet for a couple of hours so they don't stick together, before bagging them up and leaving them in the freezer. That way I can easily measure out as much as I need the night before and it will be thawed by morning. I also have my containers of chopped veggies done up, so I can just mix and match in the morning. I am watching my carbs, so this is basically what I always eat, sometimes with additional veggies. For the rest of the family I have other options.
Another cheap breakfast we do is breakfast burritos. It is rather simple to do up a huge batch. It requires 24 eggs and 2 pounds of sausage. Brown the sausage, beat the eggs (I use my stand mixer because this is a lot of eggs), and pour the eggs over the sausage. Stir until done. If you don't have a large enough skillet for this, cut the recipe in half and do two batches.
Take a tortilla, spoon some filling in, add the cheese of your choice and roll once, fold one end up, finish the roll, and then wrap in aluminum foil. Freeze in gallon size ziplocs. This recipe will fill 4 bags. We keep one in the fridge and the rest in the freezer. When we run out we take another bag out the night before. My husband likes to dip his in picante sauce or salsa. I did this one for my youtube channel so if you'd like to watch it done here it is: Text is https://www.youtube.com/watch?v=jl9orZD6JR4 and Link is https://www.youtube.com/watch?v=jl9orZD6JR4
Scrambled egg sandwiches are another. You simply scramble your egg, butter a slice of bread, spoon the egg into it and fold the bread in half. It is simple, but amazingly good (even on cheap, ordinary bread).
Pancakes and waffles are something that can be made ahead and frozen individually so they don't stick together and then bagged up for the freezer. They can be warmed up from frozen or you can just take them out the night before and then warm them up. You can use mix, but they are simple and cheaper to make from scratch. Add some hard-boiled eggs and you have your protein as well. French toast also lends itself to make ahead and freeze and is very simple to large batch cook.
Breakfast is probably the easiest meal to save money on if you don't mind some repetition. I think lunches and dinners are more of a challenge, but I will go through my recipe binder and see what I come up with. Since we buy so much in bulk off of farms and raise some of our food ourselves, it is harder for me to figure what other people's costs are. But I do have some that I think will fit the bill.
Posted in
Cutting Expenses,
Recipes
|
0 Comments »
January 6th, 2015 at 09:15 pm
Enchilada Sauce
Ingredients:
3 tablespoons chili powder
3 tablespoons all-purpose flour
1 teaspoon cocoa powder
1 teaspoon ground cumin
1 teaspoon oregano
½ teaspoon garlic powder
3 cups water
1 (8-ounce) can tomato sauce
Instructions:
1. Combine the dry ingredients in a small bowl.
2. Add water to dry mix 1 tablespoon at a time, stirring constantly until a paste is formed
3. Scoop the paste into a sauce pot and, using a whisk, add remaining water.
4. Cook over medium-high heat, stirring constantly, until slightly thickened.
5. Add tomato sauce, reduce heat and simmer 10 minutes, stirring occasionally. Makes 4 cups
For enchiladas you will need:
4 cups of cooked rabbit (or chicken) meat
1/2 a batch of enchilada sauce
Cheddar or Mexican blend cheese
Tortillas (10 inch)
Put a thin layer of enchilada sauce down on the bottom of a glass baking pan.
Lay out a tortilla on a dinner plate. Add 1/8 of the rabbit or chicken meat starting at one end and stopping 2 inches from the other end of the tortilla.
Spoon some enchilada sauce over the meat. Not too much or it will make the tortilla get wet.
Add cheese. Roll over once and then fold empty two inch end towards center of tortilla. Continue to roll up enchilada and place seam side down in baking pan.
Continue until you have finished rolling 7 to 8 enchiladas or whatever will fit in your baking pan.
Pour enchilada sauce over top of enchiladas.
Sprinkle cheese on top, as much or as little as you want. Bake in a 350 degree oven for 30 minutes. Serve.
If you would like to see the recipe with photos accompanying each step it is on my other blog here: Text is http://whendidthisbecomeafarm.wordpress.com/2014/09/21/rabbit-enchiladas-with-homemade-enchilada-sauce/ and Link is http://whendidthisbecomeafarm.wordpress.com/2014/09/21/rabbi...
Posted in
Recipes
|
3 Comments »
January 2nd, 2015 at 11:08 pm
Since there were some really great ideas posted last month when I asked about go to meals, I thought I'd ask for crockpot meals this month. I am trying to increase my repertoire of these easy to make meals.
My favorite is pulled pork made with a pork butt roast, a jar of arrabiata sauce (from Trader Joe's), 4 oz can of green chiles, and a pint of canned tomatoes, drained. Cook on low for 8 hours.
So what is your favorite? It'd be great to see some that don't rely on cream of something soup or dry onion soup mix, but go ahead and post those, too, if that's your favorite.
Posted in
Meal Planning,
Recipes
|
9 Comments »
September 14th, 2012 at 12:03 am
Does anyone have a tried and true recipe for making chicken and dumpling soup? I want one that is completely from scratch, no "cream of something" soups, no prepared biscuit mix, no bouillion cubes or stock starter. It can either be starting with homemade stock (I have some in the freezer) or starting with chicken and making the stock. I just want something good and flavorful with no fake food ingredients. Something that could have been made a century ago on your average farm.
Posted in
Recipes
|
3 Comments »
August 29th, 2012 at 10:12 pm
I don't have a lot of energy this week. Part of it is that I've been battling some kind of stomach bug off and on since coming back from vacation and part of it is putting food up for the winter. Today I made a very cost-effective lunch for my family that took me all of ten minutes, which is about what my brain could handle. Serves 4 (3 ladelfuls per bowl, DS had two bowls). You do need 3 hands for this or a way to prop the fork up later.

Egg Flower (or Drop) Soup
1 quart (4 cups) of chicken broth
1 bunch of green onions, chopped
5 eggs
1/8 tsp ground ginger
1 tsp salt
1/8 tsp white pepper (or black if you don't have white, it's just for aesthetics)
1 tsp corn starch (optional, for thickening, it didn't seem to make a difference to me so I will leave it out next time)
In a bowl take 1/4 cup of chicken broth. Mix in corn starch. Set aside.
Mix eggs well. You want them very runny. Set aside with the fork you used to mix them.
In a pot combine chicken broth, scallions, ground ginger, salt, and pepper. Bring to a boil. Boil for one minute.
Have someone hold a fork over the pot or somehow prop it over the boiling broth. While stirring with one hand slowly pour the egg through the fork. Do not stop stirring while you pour. This creates the ribbon effect. Otherwise you will just end up with blobby eggs in the soup. Stir hard for one minute after you are done adding the egg, then add the broth/corn starch mixture and allow to boil for one more minute while stirring gently. Taste and adjust salt and pepper to taste (I added a bit more salt. This is by nature a blandish soup so salt is necessary.). Soup is done.
This soup probably cost me about 25 cents. That is because the green onions came from my garden, the eggs came from Mom's chickens (free), and the broth is stock that I made previously (and froze) from leftover chicken carcasses and vegetable peelings that I had saved in my freezer. But even if paying for it, it wouldn't have been too expensive and is a nice, high protein lunch.
One variation on this is to add peas and carrots. I didn't have any, but a cup or so would have been a good addition while adding about 50 cents to the cost of the soup. Just use the canned kind and boil for a couple minutes longer before adding the egg.
Pricing it out:
$0.39 for 1 bunch of green onions (farmstand price)
$0.85 for five eggs (based on a $2 dozen)
$1.99 for 1 quart of chicken broth
$0.15 for salt, pepper, ginger, corn starch (which is likely on hand anyway)
---------
$3.38 for four servings or 84 and 1/2 cents per serving.
Of course if you make your own practically free broth from leftover chicken carcasses and vegetable scraps and peelings you save from other meals, you will bring this down to $1.39 or almost .35 per serving. Not bad and surprisingly filling (from the egg).
Posted in
Recipes
|
5 Comments »
August 13th, 2012 at 08:35 pm
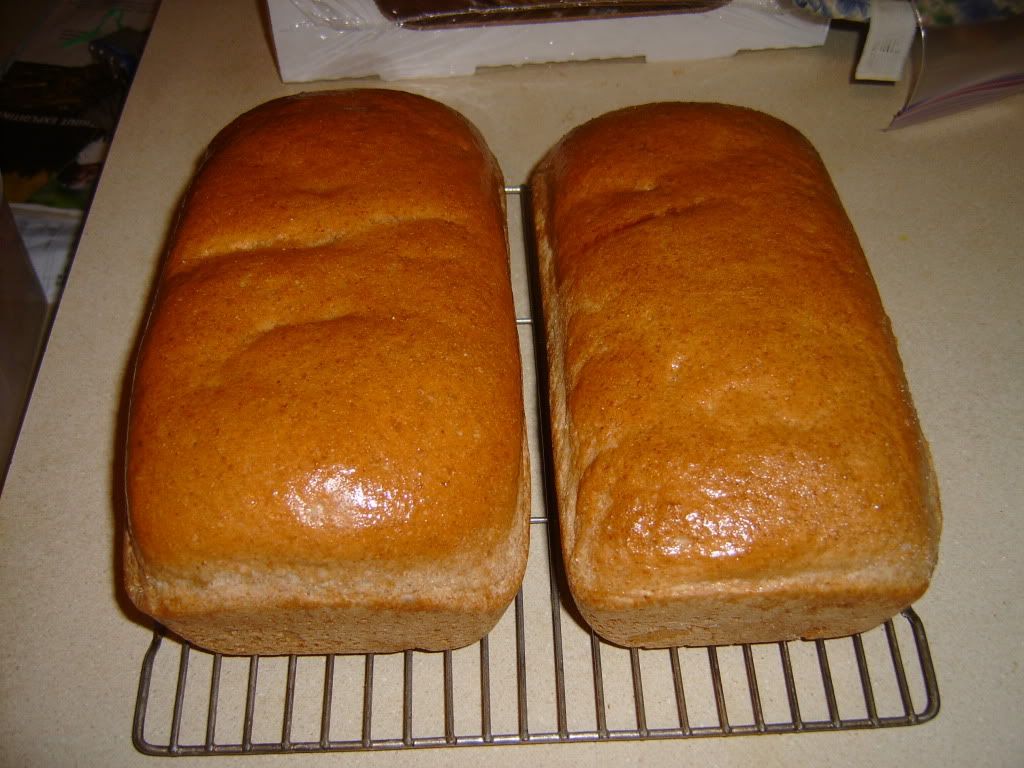
ThriftyRay asked for my bread recipe. I actually have two depending on whether I am making one loaf of bread or two.

One Loaf Recipe
1 cup warm water
1 T yeast
1 t salt
1 T honey (or sugar)
1 T extra virgin olive oil (or canola)
2 C white flour
1 C whole wheat flour
Mix together. I do it in a bread machine on manual or dough setting. I let it rise in there and then it is kneaded and then I take it out and put it in a large loaf pan and let it rise until it is about an inch or two over the bread pan. Bake in a 350 degree oven for 40 minutes. Remove from pan and place on wire rack to cool. Brush top with melted butter while still warm.
Two Loaf Recipe
2 C Warm Water
1 T yeast
1 1/2 t salt
2 T honey (or sugar)
2 1/2 T extra virgin olive oil (or canola)
3 C white flour
1 1/2 C whole wheat flour
Mix together in bread machine. Let rise and let machine knead then divide dough in half (I never get this quite even so one loaf is always a little bigger than the other, but they both turn out fine) and place in two loaf pans to rise. Bake in a 350 degree oven for 40 minutes. Remove from pans and place on a wire rack to cool. Brush tops with melted butter while still warm.
You can use all white flour and no whole wheat flour for either recipe, but if you try to substitute more whole wheat flour than what I've got above it will be too dense to rise properly.
The cost works out to about 50 cents a loaf these days.
Posted in
Recipes
|
0 Comments »
August 11th, 2012 at 02:27 am
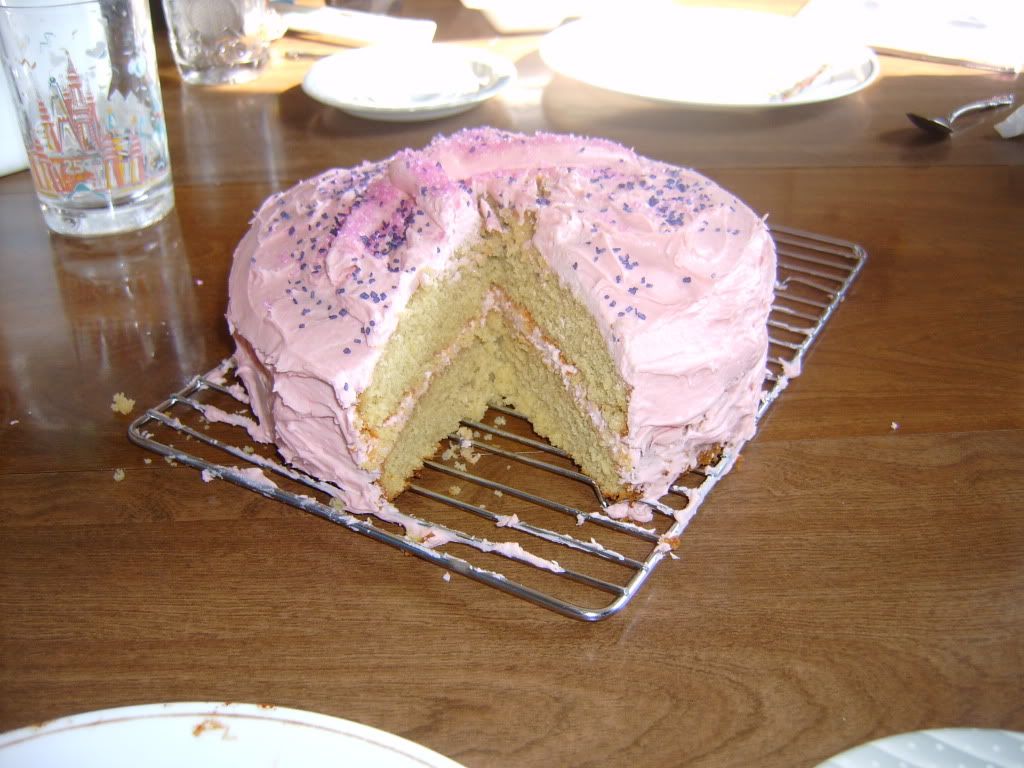
There's nothing like making a cake from scratch. I mean, sure, I could get it cheaper by buying a box mix and a can of frosting. These are not the deals they once were, but you can still get a box mix and frosting for around $3. However they are full of so many additives and preservatives and allergens that DS and I would never be able to eat them.
I've had good luck with making chocolate cakes from scratch but up until now the moist yellow cake has eluded me. Most of them call for applesauce to keep them moist. Well, DS is allergic to apples so that is out for this household. I had to search the web high and low to finally find a decent recipe and of course me being me, I dinked with it a little. Still, it turned out perfectly moist and delicious. I'd say it's the best cake I've ever made and better than even the best of the box cakes. Cost to me was about $5 and most of that is in the powdered sugar and butter. And that's still a far cry from a bakery cake at $18.
The eggs were from our backyard chickens so they were free and I had everything on hand in the pantry so there was no out of pocket expense for making it. The only problem with using fresh eggs was the yolks were so orange I didn't think we were going to have a yellow cake. We added a bit of the natural India Tree food dye to make it more yellow and less orange and also added a few drops to the frosting to make it pink, which is currently DD's favorite color.

Anyway, I'm sharing the recipe I ended up with.
2 1/4 cups of all-purpose flour, unsifted
1 1/2 cups of sugar
3 1/2 teaspoons baking powder
1 teaspoon salt
1 1/4 cups milk
1/4 cup canola oil
1 stick unsalted, softened butter
3/4 tablespoon pure vanilla extract
3 large eggs
Preheat oven to 350�
Combine dry ingredients and mix together well.
Add milk, oil and vanilla and beat for 2 minutes on the cake setting of your mixer. Add eggs and beat another two minutes (this is when I added a few drops of natural blue India Tree food dye to counteract the orangeness of the fresh eggs).
Pour into two pre-greased (I used butter) round cake pans. Bake for 35 minutes. The original recipe I based this off of called for 20 to 25 minutes, but the toothpick was goopy after 20, 25, and 30 minutes. It wasn't done until 35. This was with a gas oven.
Allow to cool on wire racks for ten to fifteen minutes and then remove from pans and place directly on wire racks until cool, about 2 hours.
Frosting:
2 sticks of unsalted, softened butter (1 cup)
3 1/2 cups of powdered sugar
1 teaspoon milk
1 teaspoon pure vanilla extract
1/8 teaspoon salt
Few drops of food dye if you wish to color it (I used India Tree's natural food dye in red)
Combine butter, sugar, and salt and beat until well blended.
Add milk and vanilla and food dye and beat for 5 minutes. When it is smooth and creamy it is done.
Frost bottom layer of cake on tops and sides. Place second layer on top and repeat. Add sprinkles (we used India Tree's natural blue and pink sprinkles). Eat.

Posted in
Recipes
|
6 Comments »
July 28th, 2012 at 04:52 am
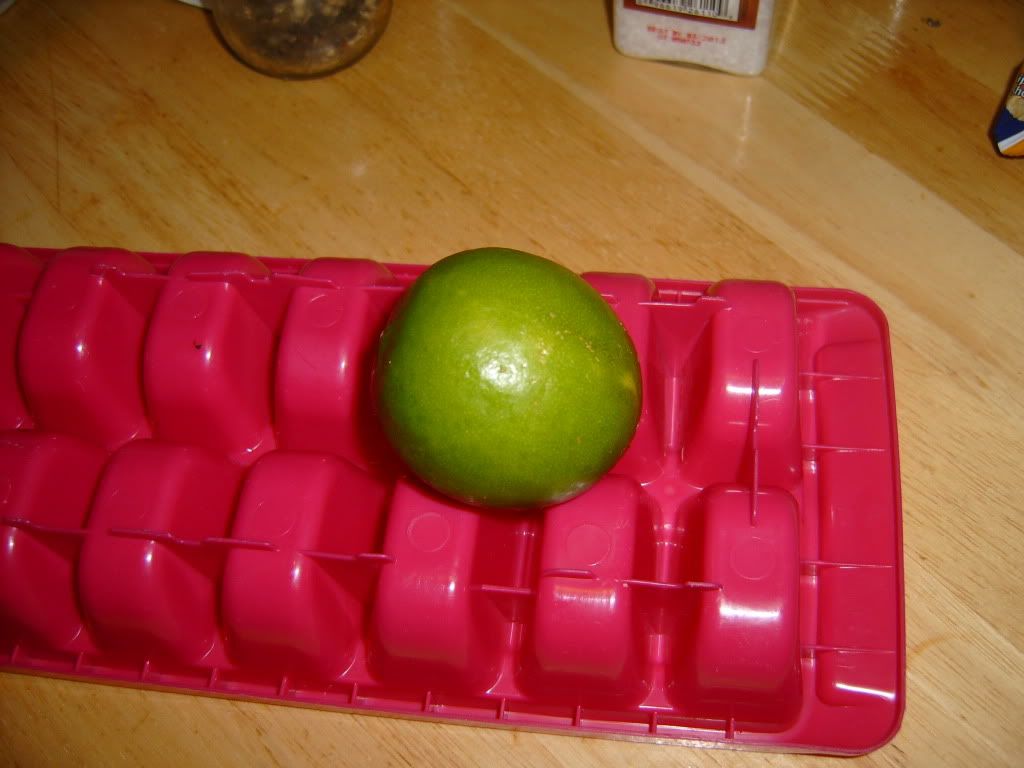
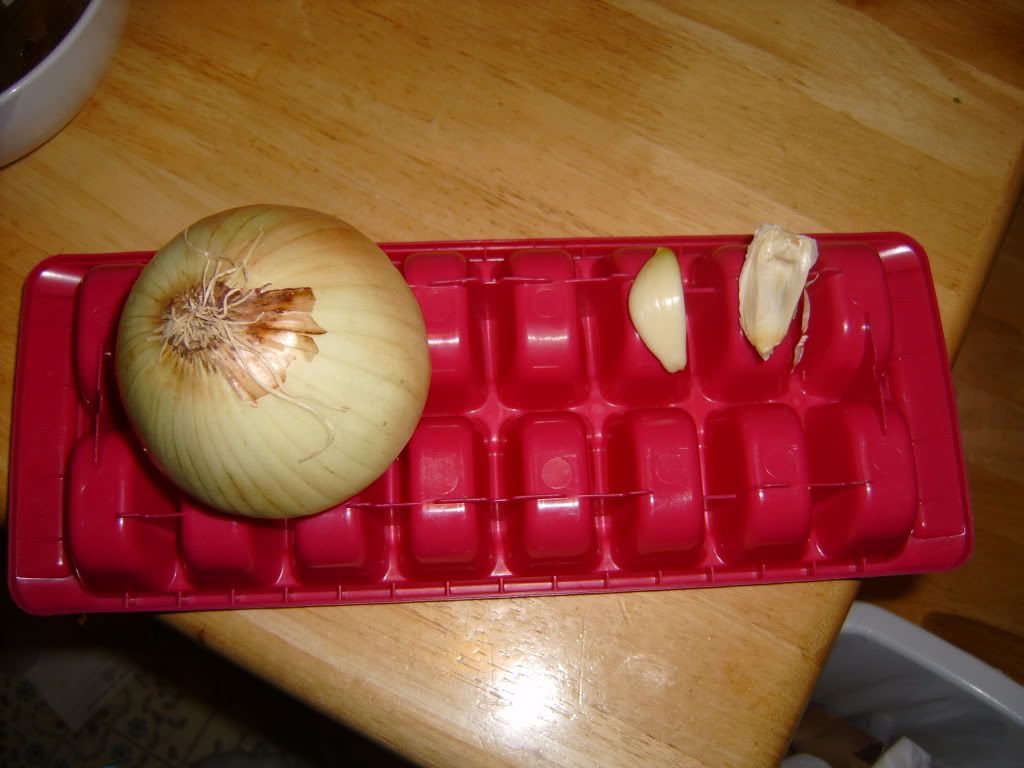
Today I made homemade salsa. It turned out really well. I did the usual thing that I do when I want to make something that I either haven't made in a really long time or have never made before. I looked at a bunch of recipes on the internet and then made up my own. I don't think I could follow a cooking recipe line for line if you paid me. Baking, yes. That's a whole other animal, but not cooking.
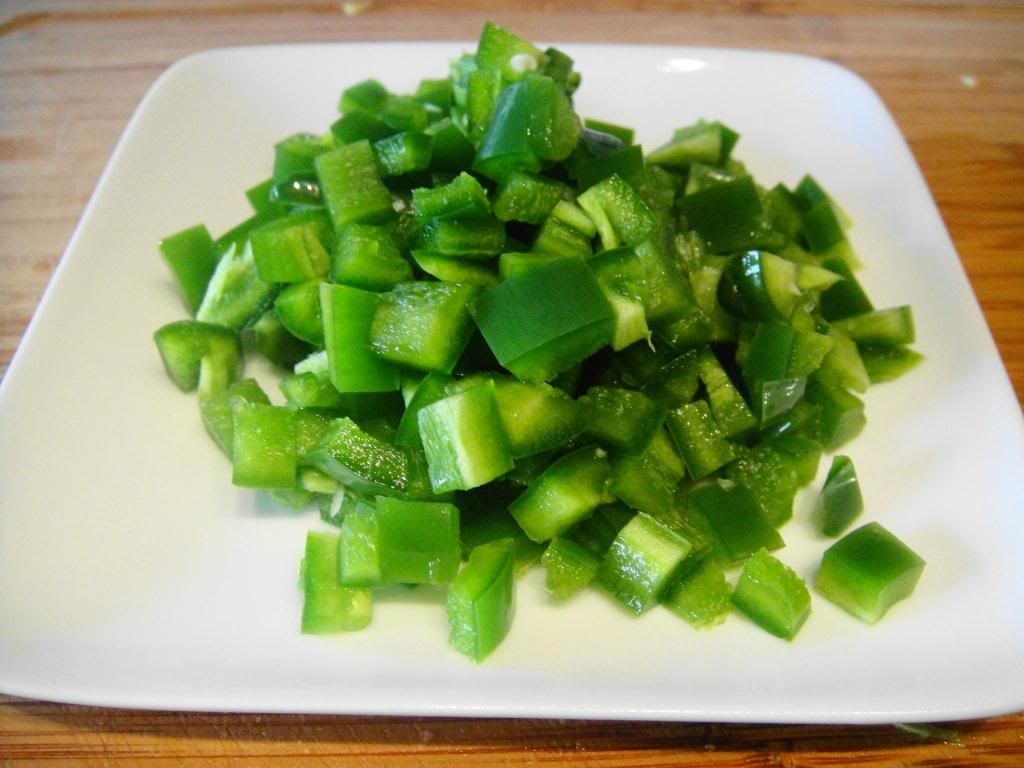
Anyway, I started with the juice from one lime and threw it in the blender.

And diced half a yellow onion and 2 really enormous cloves of garlic (probably 4 smaller cloves would do from a non-mutant head).

I chopped up about a cup's worth of fresh cilantro.

And then diced 2 jalapeno peppers.

I took about 1/8 tsp of the seeds from the peppers and discarded the rest. You can use them all or more than I did, but I was trying to make a salsa my kids would eat.
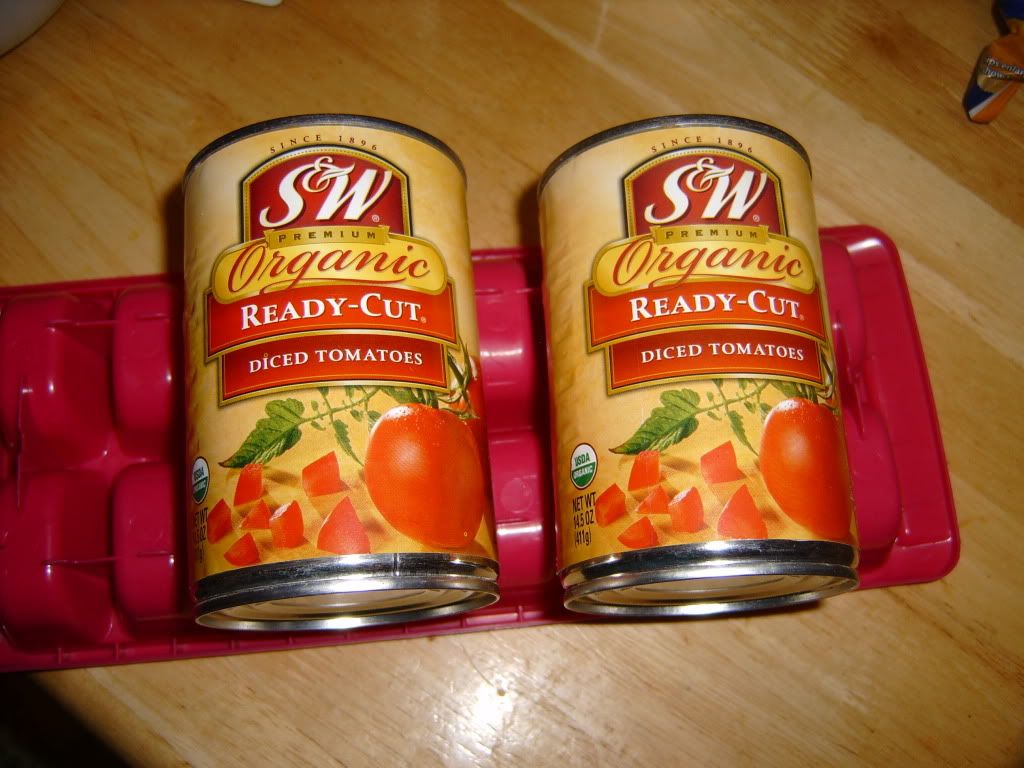
I took 2 cans of organic diced tomatoes including the juice and added it to everything else in the blender.

I didn't want to pay the prices for off season organic tomatoes at the store, but I imagine about 2 pounds of tomatoes would substitute for the 2 cans.
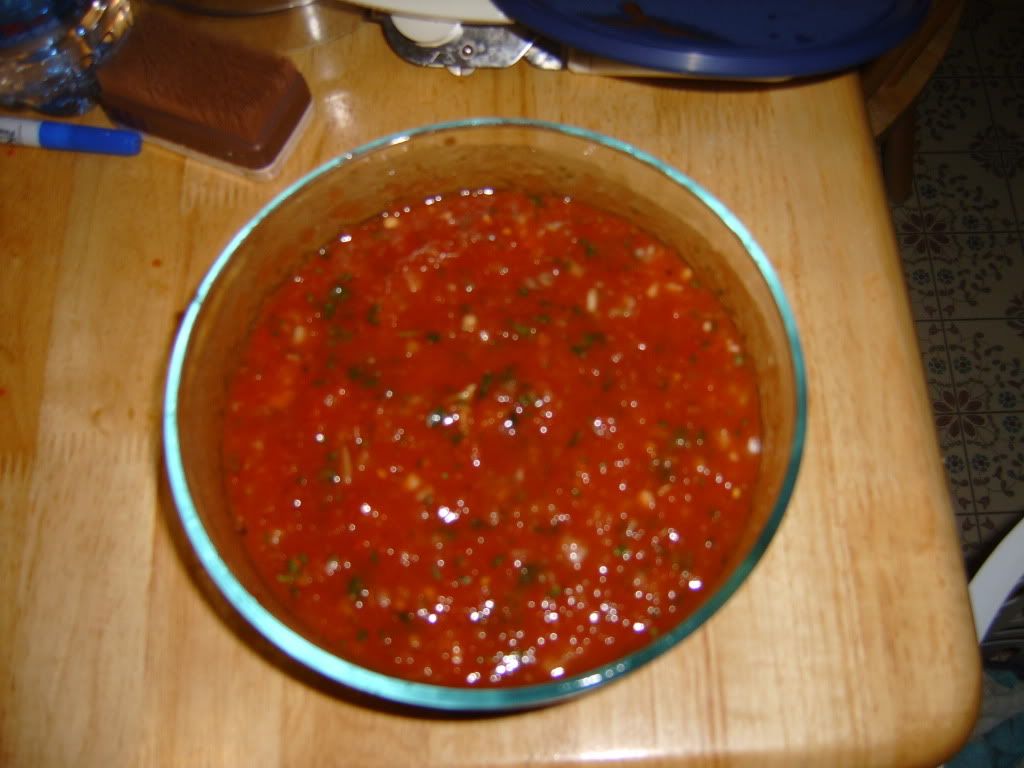
I added in 1 tsp of freshly ground sea salt and 1 tsp of freshly ground pepper and blended the whole mess on low, level 4, for about 20 seconds because I wanted to keep some chunkiness to it. Now is the time to taste it and adjust your salt, pepper, and jalapeno seeds to taste.
And the tasty end result:

This made a little over a quart of salsa. Next time I will cut the recipe in half and just make around a pint, but I will definitely make it again. It's worth it in freshness, flavor, and I saved about $2 over the cost of buying the same amount of jarred salsa. That cost will drop once my own tomatoes are ripe.
Posted in
Cutting Expenses,
Recipes
|
5 Comments »
July 23rd, 2012 at 03:39 am
We did some moving of stuff to storage today. We ended up emptying our 2nd unit at the one place. We got a bigger 2nd unit elsewhere for about $20 cheaper. I would like to change out our bigger unit, too, in time because we could save quite a bit on it at the new place. The only real difference between places is one is outside the city limits. So it's two miles further away, but that is worth it for that much less money. They also do not require extra insurance. Since our homeowners policy has a rider for storage items, this is a savings of $15 a month.
--------------------
The man who was supposed to come out and check the house for painting and estimate on the door repairs called to say his daughter had been hurt and rescheduled for Wednesday. *sighs* Will we ever get this done?
----------------------
I picked 2 pints of blackberries today. I have enough to make jam. Speaking of jam we finished off the first jar of strawberry jam and opened up the first jar of apricot jelly. It definitely is not jam like, but jelly like. It was so good. Everybody loves it. And it was perfect even without pectin.
------------------------
Those green onion bottoms that I planted have started sending up shoots. I count 3 so far. It worked!
------------------------
I did not make pot roast today as I had some food that needed using up so instead I made chicken/turkey noodle soup today for dinner. Well, yesterday before we went to the farm I threw 4 turkey legs and a bunch of chicken wings that were just starting to get freezer burn in the crockpot with 2 cups of water. I let it cook all day on low and last night I picked all the meat off the bones and returned it to the crockpot. I added all of the onion skins, carrot peels, garlic skins, bits of green onion that hadn't gone bad but no longer looked its best that I have saved in the freezer and the four chicken carcasses that I have saved in the freezer.
I chopped up half a bunch of fresh parsley, smashed five garlic cloves, chopped up one and a half onions (along with their skins), some celery leaves, and chopped two carrots. I added 1 tbsp of white peppercorns (what I had on hand) and 1 tsp of fresh sea salt. I filled up the crock to the top with water and let it go all night and until 5 o'clock tonight.
Then we put it through a collander, put the broth in a stock pot, and tossed the remains in the crock into the compost (we have a heavy duty rubbermaid plastic compost bin so the animals can't get into it. I usually don't compost bones but in this case I will). The broth was a rich brownish gold color (turkey makes it light brown).
I washed and peeled one onion and three carrots, saving the peels and skins in a new stock bag. I chopped them up and sauteed them in olive oil for about 15 minutes to make them soft. Meanwhile I boiled half a pound of egg noodles in the broth. After fifteen minutes I added the carrots and onions (I was out of celery or it would have been in there, too,) to the broth and then added 3 cups of the cooked chicken and turkey meat and let it warm through, about 3 minutes.
After that I adjusted the seasonings, adding about 1 tsp of black pepper, 1 tsp of sea salt, 1/4 tsp of ground celery seed, 1/4 tsp of onion powder, 1 tsp of thyme leaves and 1/4 tsp of garlic powder. We also added salt and pepper to taste at the table. Some of us like a bit more pepper than others of us.
I ended up with enough soup to feed the five of us 7 big bowlfuls (DH and DD had seconds) and I have a quart and a half leftover in the fridge. I think I am going to do up the rest of the chicken wings over the next couple of days. The bag was originally 10 pounds and there are about 7 pounds left so I think I will do it in two batches and make up more stock and then just pressure can the stock in pint jars so we have it on hand. I'd really like to do that. I had planned on it before but plans fell through. I would net about 8 pints of broth this way, I think, and that's about a canner level full.
Most of the things I put into the soup were foods that were looking worse for wear, too, especially the carrots and onions, but you couldn't even tell in the finished product. I'd say the expensive of it was in the fresh parsley and the meat itself.
Altogether the cost to me was about $6 for 5 quarts of soup. That's 10 pints, which is equivalent to ten cans of a big-noodled, chunky-style soup in the 16 ounce can. One with all organic ingredients is $2.99 at the cheapest place. So for an equivalent amount of organic soup I would have paid $29.90. That's a cost savings of $23.90. My son will eat a can of soup a day and he is happy to eat this instead.
-------------------
I also made two loaves of bread today. We ate over half a loaf with our soup with strawberry jam and apricot jelly. So very good. I will have to make more bread tomorrow. My neice is spending Monday night as we are taking her with us to the science center on Tuesday to see the King Tut exhibit as her birthday present. We will be taking sandwiches down with us so will need plenty of bread, but we will also be making French toast for breakfast that morning for her, DS, and DH. We will also have sausage and bacon and eggs and cucumber slices for those of us who low carb at breakfast. They can have jam if they want it on the French toast.
I am really looking forward to seeing the exhibit. I saw it when it came through when I was a little kid in the 1970's, but I really want to see it again as an adult. This is part of our "vacation" this summer, since we aren't having a real one.
Posted in
Cutting Expenses,
Vacation Planning,
Recipes,
,
Sustainable Living
|
2 Comments »
July 11th, 2012 at 05:24 pm
Looking Forward wanted my recipe for this so here it is. I find stir-fries to be relatively frugal, especially since you can always add more veggies to stretch it if you need to.
Tropical Chicken Stir-Fry
Ingredients:
1/2 cup soy sauce
1/4 cup pineapple juice
1/3 cup canola oil
1/4 cup water
4 tablespoons minced onion (I use the white parts from green onions, but any onion is fine)
2 tablespoons sesame seeds
2 tablespoons packed brown sugar
4 large, fresh garlic cloves, minced (don�t cheat and use the jarred stuff, it�s worth using fresh)
1 inch fresh grated ginger (or 1 tsp ground)
1/16 teaspoon cayenne pepper
1 pound boneless skinless chicken (I use thighs) cut into strips
1 pound (or more) of stir-fry veggies of your choice. I usually use snow peas, carrots, celery, bok choi, broccoli and cauliflower.
Oil for cooking. I use peanut oil if I have it, but canola oil works, too. Olive oil changes the taste so I would not recommend it.
Directions:
To make marinade, mix the first 10 ingredients. Set aside 1/3 cup marinade. Place chicken strips in ziptop plastic bag or marinating dish and pour in marinade.
Cover chicken (if using dish) and refrigerate for most of the day or overnight, turning once or twice if you can to thoroughly coat chicken.
Discard used marinade. Heat oil in the bottom of a wok or large saut� pan. Stir-fry chicken on medium high until cooked through, 3 to 5 minutes. Remove chicken from pan and add vegetables. Cook until vegetables are tender crisp. I usually cook the broccoli and cauliflower for about 2 minutes and then add the other veggies and cook another 3 minutes. Add the chicken back in and the reserved marinade. Cook until chicken is warmed through and marinade is hot.
Note: I usually use the juice from canned pineapple for the marinade. If you don't have canned pineapple or pineapple juice, but can get a hold of fresh, just add a half cup of small pineapple chunks in when you put the chicken and reserved marinade back in the pan for the same flavor.
Posted in
Recipes
|
3 Comments »
July 7th, 2012 at 10:29 pm
I am very pleased with how the mustard turned out. I ended up combining a few different recipes to make one that I thought would appeal to me best. I don't know why so many recipes call for cayenne in ordinary yellow mustard. I didn't use it and mine has enough kick without it. It's probably around the range of French's yellow mustard, not super spicy, but definitely a bit of heat. I love French's mustard for flavor, but the yellow # 5 I can do without.
I have always been a pretty loyal French's mustard girl, but I think this actually tastes just as good, maybe even a little better. It seems mild at first, but then it gives a little kick.

Here's the recipe I ended up concocting:
Dry Ingredients:
1 cup of mustard powder (I used yellow, but brown is fine if you want brown mustard, I wanted yellow)
2 tsp kosher sea salt (ordinary salt is fine)
1 tsp flour (I just used white all purpose)
1 tsp turmeric (makes it more yellow and gives a little kick)
3/4 tsp garlic powder
1/2 tsp paprika
1/2 tsp onion powder
Wet Ingredients:
1 cup water
3/4 cup white vinegar
1 tbsp lemon juice
Mix together all of the dry ingredients and stir until combined. Add to sauce pan. Mix water and vinegar. Add to sauce pan. Stir until combined and you can see no lumps. If there are any lumps squash them against the side of the pan until the powder comes free and mix it in.
Turn on heat and bring it to a boil. Boil for 10 minutes while stirring. I stirred it pretty constantly because otherwise it would try to splatter out of the pan. I kept it on a low boil because a high boil was too messy.
Now most of the recipes I saw said to put it in a blender at this point to make it smoother, but it looked plenty smooth to me and I didn't want to cool the mustard down since I was going to be canning it and I didn't want to lose part of it to the sides of the blender container either. If I had a handheld blender I might have done it right there on the stove, but like I said, it didn't seem grainy at all so I skipped that step.
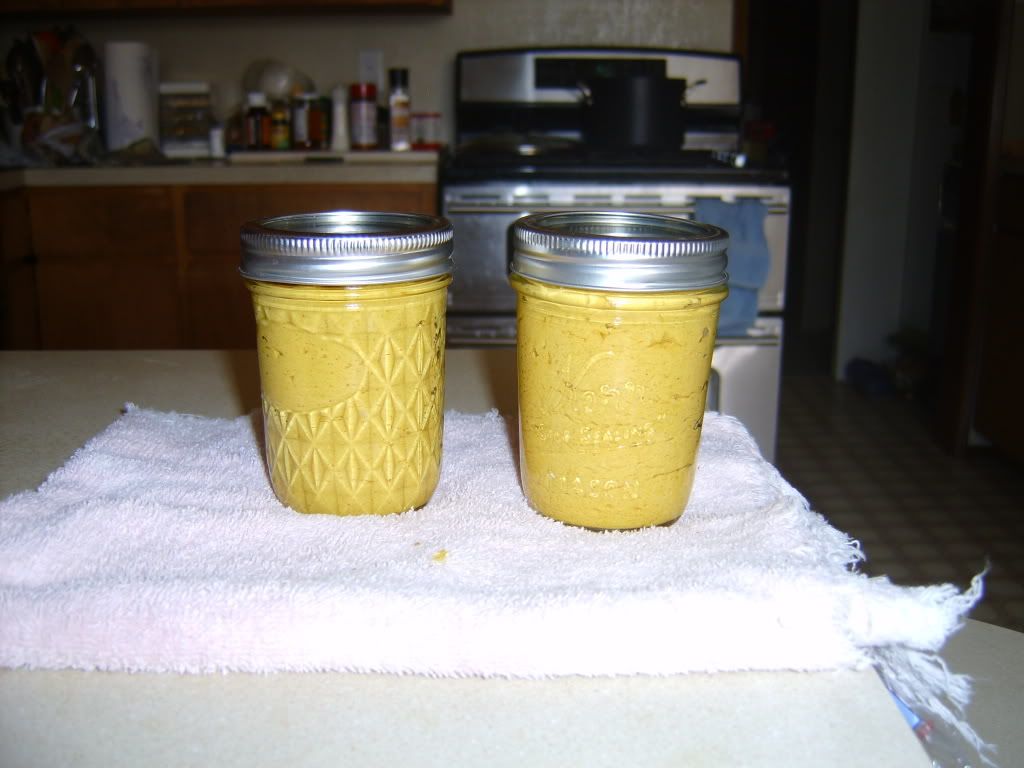
At this point I turned off the heat and I stirred in the lemon juice until it was absorbed. I then poured it into my hot, sterilized half-pint jars, leaving one inch of head space, that is one inch from the top of the jar. The mustard will expand during processing so don't overfill. I then thumped the mustard down into the jars to get rid of any air pockets. I put on my lids and rings and put the jars into my boiling water bath, then I processed for 15 minutes.
I actually had enough for 2 half-pint jars with a little less than a quarter cup left over so I put the extra into a clean jar and put it into the fridge. The jars sealed up just fine, pinging within minutes of taking them out.
I bought the organic mustard powder in bulk from the food co-op. Everything else I had on hand (and was also organic, except the vinegar). A cup of mustard powder cost me $2.00. I can estimate that the rest of the ingredients might have been .50 worth, so about 20 ounces of mustard with no additives for $2.50. About what I'd pay for regular storebought mustard, and less than I'd pay for organic storebought mustard. I'm considering this organic because for it to qualify as an organic processed food in the industry, 80% of it must come from organic sources and this does.
I'll make this again later this summer, but right now I've got some raspberry canes calling my name. I think jam is in my near future.
Posted in
Recipes,
Sustainable Living
|
2 Comments »
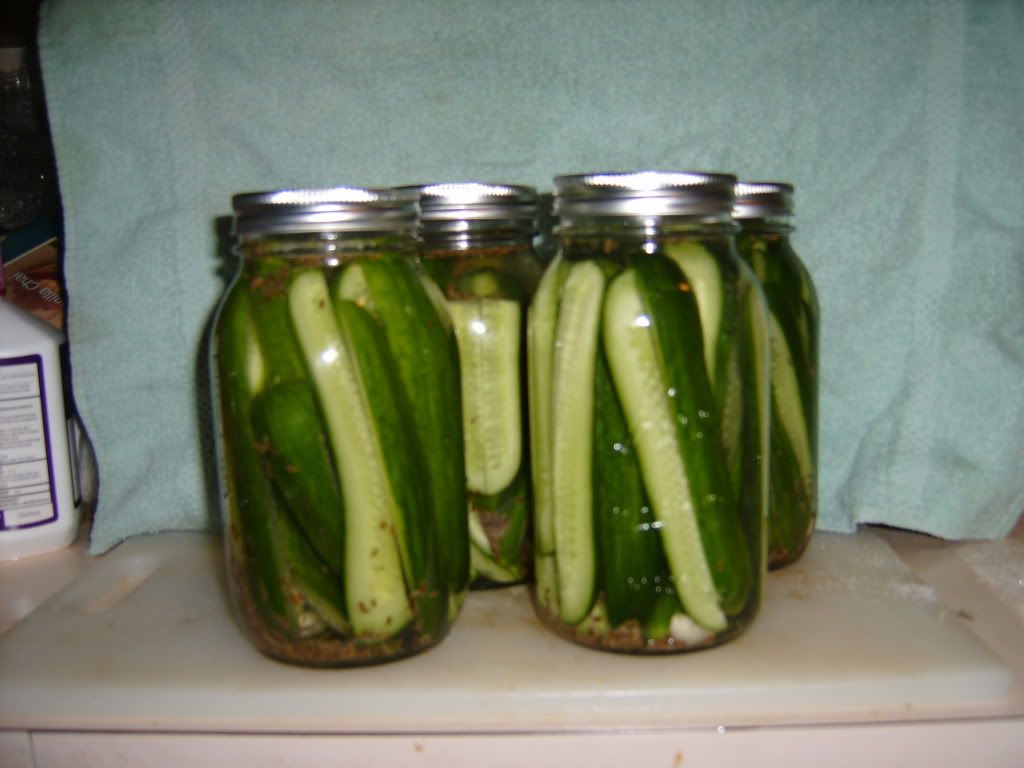
June 2nd, 2012 at 05:45 am
And it was easy. Now I have additive and preservative and coloring free organic pickles that will last me quite some time, as I am the only one who eats dill pickles in this house (although DS did express an interest in trying these ones). This isn't as frugal as it will be when I have my own home-grown cucumbers to preserve, but then it'll be downright cheap.
Aren't they pretty?

They were quite simple to make. I simply mixed 8 cups of water with 1 cup of vinegar and 1 cup of pickling salt. Stir until the salt dissolves. This is probably the longest part of the process.
Crush 16 cloves of garlic and put 4 each into the bottom of a sterilized quart sized canning jar. Add 1 tbsp of dill seed (NOT dill weed) to each jar. Cut up your clean cucumbers and fill the jars. (I used pickling cucumbers and cut them into fourths, but you can leave them whole or cut them however you want. You can also use any cucumbers, this was just what they had that was pesticide free). I used five cucumbers per jar. Leave about an inch of head space in each jar.
Pour the water/vinegar/salt solution into each jar, leaving 3/4 inch of head space. Loosely put your sterilized lids and rings on. Set aside for 48 hours and then tighten the lids and refrigerate for up to six months.
This actually makes enough solution for 5 quart sized jars, but I didn't have enough cucumbers for that. This is the first time I made it so I'll know for next time. They already smell good so I sure hope they are as good as they smell and look. I'll know Monday at dinner time! 
And this summer when my garden produces I want to make some that are shelf stable and not just ones that will keep in the fridge, because I'll want some for when these ones run out and there isn't a good source of cheap, organic cucumbers.
Posted in
Recipes,
Sustainable Living
|
7 Comments »
May 26th, 2012 at 09:10 am
I'm still feeling off. Not quite sick, but not quite right. My allergies are really acting up and it was very hot today, 75 degrees (which is really hot here for May) after several yucky rainy days around 60. Weather swings like that always bother me. I still have the window open at 1:30 a.m. Yes, I know I should b sleeping. Insomnia.
So I didn't stick to my meal plan tonight, either. I made taco meat in the microwave instead and we had tacos and fruit and some lovely milk (the glass bottled organic stuff). I did feel up to making some easy peanut butter cookies, though. Well, I wanted them enough to make them, let's say.
They are so fast and so easy and this time I made them with organic peanut butter instead of Jif (only ingredient was peanuts). They were even better, and I thought the ones I made with Jif were fantastic. (And I'd still be using Jif if Costco hadn't decided to switch to Skippy which DS can't have due to his food allergies, but now we are out and I am not paying regular grocery store prices for Jif, sorry). Oh, and I made it with a duck egg instead of a chicken egg this time so that may have made a difference. (Not from our ducks, they are too young yet, but the food co-op had some and I wanted to try them).
I love my little three ingredient cookie recipe. Just one large egg, one cup of sugar, and one cup of peanut butter. Mix together sugar and egg, then mix in peanut butter, then roll into balls about an inch in diameter. Press down on them with a fork. If the fork sticks use a little water on it. I did not have a problem with sticking this time, though when I used the Jif I had to get the fork wet every fourth cookie or so. I think it was because Jif is creamier and has such a light texture and the organic stuff was denser with a heavier texture and more oil.
Anyway, bake for ten minutes in a 350 degree oven for softer cookies (they won't really look done but they are) or fifteen minutes for a bit harder (like if you were making ice cream cookie sandwiches). It makes about a dozen cookies. Well, I got 14. I guess it depends on the size of the balls you roll.
Today was payday and the money that DH never got paid in February was on this paycheck, so that was nice.
We've had an unexpected expense come up. We had to buy a new set of boxsprings for the bed. I wish to heaven we had never given away the old ones. They were solidly built and these junky ones that came with the new mattress are lousy. They've broken after not even five months use. They are just so incredibly flimsy. They are supposedly rated up to 750 pounds and DH and I are nowhere near that!
I am ticked because the only reason we bought the box springs is that the furniture store guy said it would void the mattress warranty if we didn't. Well...plbbbbtttt! Because without the support of proper box springs the mattress doesn't hold up, does it? The cross pieces in the box spring are made out of the thinnest, cheapest looking particle board. It might as well be cardboard. And of course the 90 day warranty is up.
So we bought an Eco-Lux box spring frame. We'll be out the $49 we spent on our Hollywood frame and of course the money we spent on the box springs. It had really good ratings and seems far sturider than anything else we looked at. Although anything is better than what we've got now. Since I don't trust regular box springs not to be junk now, this sort of thing seemed the way to go. I hope it works otherwise I'm not sure what we can do short of marching into a furniture store and demanding to see the guts of all their box springs.
Tomorrow DS is marching in the Ski to Sea parade and then I am hoping to make it down to Burlington to purchase some more meat at the Skagit River Ranch. I want to get 4 beef chuck pot roasts, 4 packs of bacon, 2 whole chickens, several pounds of hamburger, a pack of the spicier sausage, 4 ribeye steaks and some pork chops. I also want to ask them about how the pig thing works, if we'd have to buy a whole one or if you can do a half. They do have family boxes you can buy at certain times of the year that would be less than buying a whole pig, but I don't think we eat enough pork to make it worthwhile. Usually we have bacon, maybe sausages (though I prefer beef sausage) and hams. On occasion pork chops, but rarely pork roast (unless I'm making pulled pork for burritos). Of course this might taste so good it changes our minds. I do love the bacon and the polish sausages. I wish they made hot dogs. Ever since TJ's made a change in their hot dogs a few months ago I haven't liked theirs anymore.
If we don't get done with the parade in time to go down then we will go next Saturday. The farm store is only open on Saturdays.
Not much else going on. I did pay some bills, but I will try to detail them tomorrow (or technically today, being as it is past midnight).
Posted in
Appliance Antics and Household Purchases,
Meal Planning,
Ee ii ee ii oo,
Recipes,
Sustainable Living
|
2 Comments »
May 17th, 2012 at 09:04 pm
Well, I clearly made too much spaghetti on Monday because there is still a good batch of noodles and sauce sitting in the fridge. Normally the kids eat it after school for snacks but this time it just appears to be sitting there. So I got to thinking about it. My first thought was freeze the sauce and don't worry about the pasta, everything says pasta doesn't freeze well. But that thought doesn't go over well with me, because I am trying to use up all my food, not just throw it out because I don't know what to do with it.
Then I thought, wait a minute. Lasagna freezes great and it's pasta. And I see prepared frozen spaghetti and mac and cheese all the time when I go down the frozen food aisle at the grocery store. Maybe plain pasta by itself doesn't freeze well, but what about some kind of casserole. And then I remembered something I used to make back in our low income days after a huge pot of spaghetti was getting boring. Leftover Spaghetti Pie!
I don't think I ever really had a recipe for this, I kind of just threw it together. I'd grease a pie plate or a square glass baking dish with butter (because everything tastes better with butter) and I'd dump the leftover spaghetti in. I'd take a butter knife and kind of cut up the pasta into more manageable chunks. Then I'd mix in about a pound of cooked ground meat.
I used to be in the habit of making up five pounds of hamburger at a time and keeping some in the freezer in one pound bags for busy days, so I'd just grab one, give it a quick thaw in the microwave, and dump it in with the spaghetti. I'd then dump in the leftover spaghetti sauce (unless I'd mixed the sauce and pasta when we ate it). Usually about 2 cups worth (or if you don't have sauce made up 1 16 ounce jar's worth). I'd mix it around until it was all evenly distrubted and then I'd mix in some hard cheese like parmesan or romano, sometimes both. Maybe 1/2 a cup or so in total. Then I'd cover the top with mozzarella and then sprikle some extra sharp cheddar cheese on top of that.
I'd bake it in the oven for about 30 minutes on 350 degrees and out would come a beautiful, browned, bubbly casserole. So that's what I'm going to do with my leftovers. Only without cooking it. I will cover it with aluminum foil instead and put it in the freezer, take it out one night next week to thaw and bake it for dinner the next night.
Posted in
Meal Planning,
Recipes
|
0 Comments »
May 12th, 2012 at 03:36 am
I decided to make sourdough starter tonight. I haven't made sourdough bread (or starter) in several years, mostly because I didn't want to tie up my biggest glass bowl at the time. Starter has to be made in a glass, ceramic, or crock container and can only be mixed with a wooden or plastic spoon as it reacts badly with metal and you can easily kill it. Now I have a gigantic glass bowl (that came as part of a set one Christmas) and it is a pain in the butt, quite frankly. It's heavy and takes up way too much space in the fridge, but it is just perfect for setting on the counter for ages and holding starter.
I love making bread (and not having to buy expensive additive free store loaves!) but I haven't done it much of late and I really want to get back into it again. As I am getting low on yeast and want to save it for when I make rolls and buns, starter is a good way to go. It only takes 2 1/4 teaspoons and then you never need to use yeast again unless you kill your starter off. It's the ultimate in frugality if you bake every day. I end up spending somewhere around 50 cents a loaf and I love that when similar bread would cost me $4. And there is nothing like the smell of fresh sourdough bread permeating the house.
If anyone else is interested in making a sourdough starter, there are some great directions on this page: Text is http://whatscookingamerica.net/Bread/SourdoughStarter.htm and Link is http://whatscookingamerica.net/Bread/SourdoughStarter.htm. It's pretty much foolproof if you follow the directions exactly. I am really looking forward to my first loaf, even if it won't be for several days.
Posted in
Recipes
|
3 Comments »
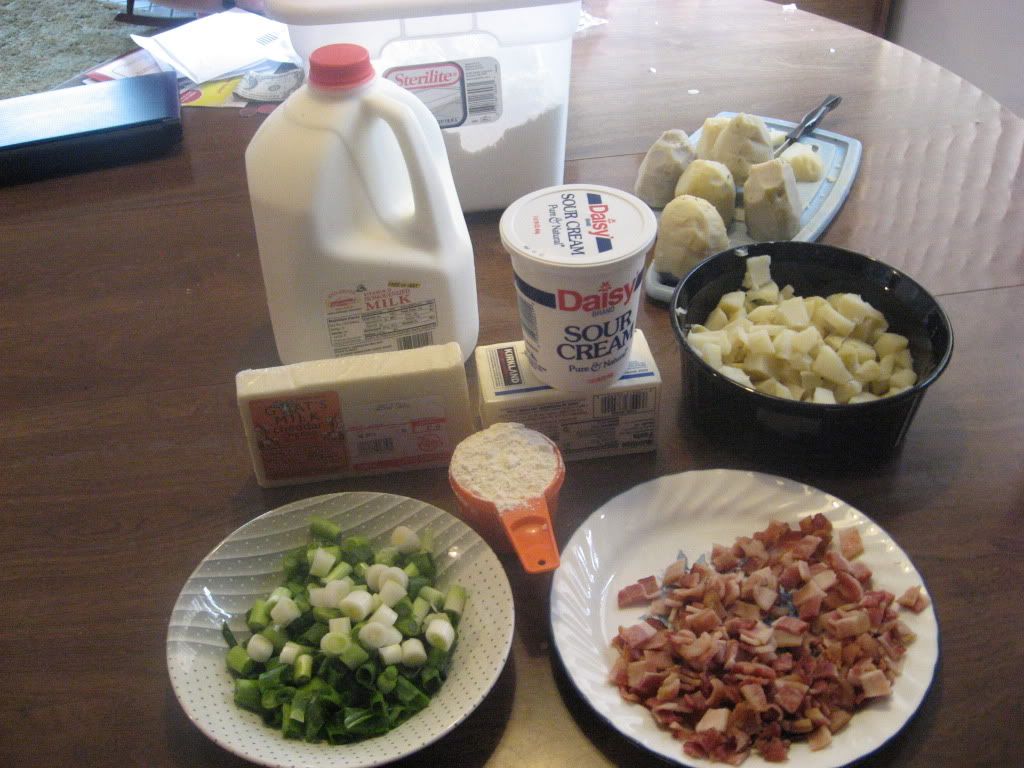
April 26th, 2012 at 01:34 am
Dinner tonight seems a little pricy at first glance but considering that most of the ingredients were organic, sustainable, or additive/preservative free and how many servings one gets out of it, a hefty 16, it's not bad at all. It provided dinner for four and will provide several lunches or after school snacks this week. DH and DD ate two bowlfuls, but DS and I were both happy and filled up with one.
Here's my price breakdown and ingredients list:
8 organic russet potatoes $3.12
1 pound smoked, additive and preservative free bacon $3.99
1 bunch organic scallions .38
1 gallon local whole milk $2.99 of which 8 cups are used in the soup and the rest was drunk at dinner
1 lb organic and sustainable local goat's cheddar $7.19
2/3 cup butter $1.50
2/3 cup flour .10
1 lb Daisy organic sour cream $2.50 (was on sale 2 for $5)
So total spent was $21.67. Of course the price can be brought down by using less expensive cheese (but it's what I had on hand) and bacon with junk in it and non-organic potatoes, but still, not bad for 16 servings.
It is best to start with everything premeasured and cooked. I like to do the bulk of the work the day before or even earlier in the week. The potatoes were baked on Sunday and the bacon cooked earlier today. Then before I started we peeled the potateos and cut them up and chopped up the scallions and bacon just before starting. It is easier to chop up the bacon when it is cold than when it is still hot.

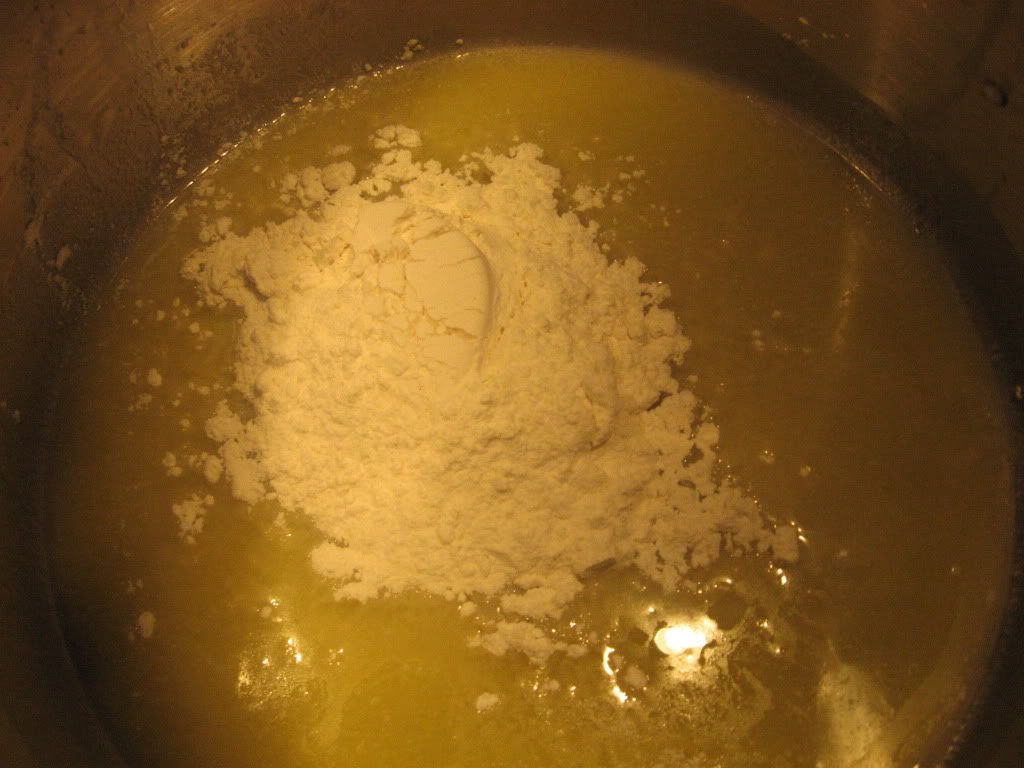
To start melt 2/3 cup of butter in a pan.

Add 2/3 cup of flour.

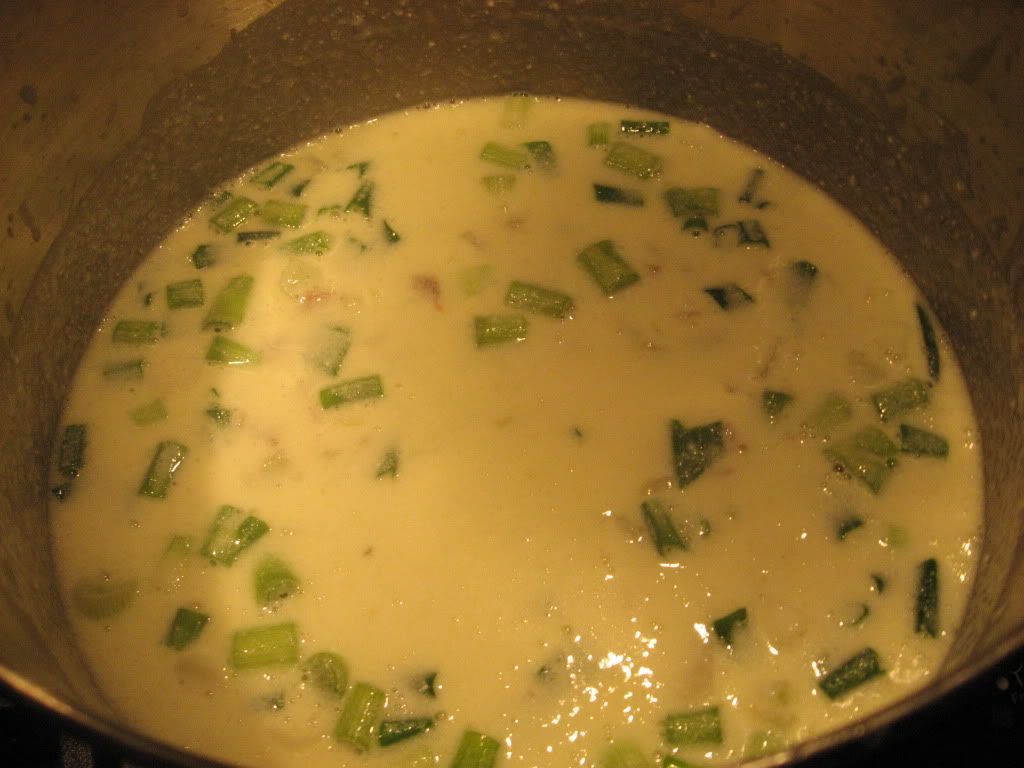
Whisk together over medium low heat to make a roux.

Turn heat up to medium high. Gradually stir in 8 cups of whole milk, then stir in 1 pound of sour cream until it is absorbed and soup base is of a creamy consistency. Add in the shredded cheddar cheese and stir in until melted. Turn heat up to high and put in the diced potatoes and scallions. Cook for five minutes. Dump in bacon and cook for 3 more minutes.

Add in salt and pepper to taste. The original recipe I worked off of in the beginning suggested 1 full tablespoon of sea salt and a teaspoon of black pepper. I find that to be too much salt combined with the bacon, but just right on the pepper. And of course individuals can add salt and pepper at the table as well.
Spoon into bowls. Dinner is served.

Posted in
Meal Planning,
Recipes
|
2 Comments »
February 21st, 2012 at 04:54 am
It was fast, too. I saw some tips for making a quick chicken noodle soup using these teeny little pasta noodles that look like the type used in school lunches circa 1979 in chicken noodle soup or what they have in Mrs. Grass's Noodle soup. Well, I didn't have those, but I had Capellini (Angel Hair) that I broke up into inch long pieces.
Anyway, I brought some free range organic chicken broth (I bought on a really good sale, 16 ounce box) to a boil and dumped in the noodles. I then quickly cut up a boneless, skinless chicken thigh and dumped it into the boiling broth at the five minute mark. While that started cooking I quickly diced a scallion. I grated half a carrot on my big cheese grater. As soon as the chicken was opaque I dumped in the carrot shreds, added a few grinds of sea salt and pepper and let it cook another minute. Then I added the scallion and turned off the heat. I let it set a minute for the scallion to cook in the broth and then it was done. It was really good. I did miss celery, but that doesn't really shred.
I like my noodles limp and not al dente so if you like them al dente you could boil for a little less time. The chicken only takes five minutes or so, so change your plan accordingly, by having everything ready to go at the start.
It really didn't take that long. Maybe 15 minutes from start to finish, including clean up time. I know a can of soup only takes a few minutes, but to have fresh soup in very little time was quite nice. It also served all three of us and usually one can serves 1 person around here. Since most soups cost at least a dollar a can and the healthier soups $2 to $3 now, I did well on cost of ingredients versus 3 cans of soup. And no MSG or major amounts of sodium, either.
Posted in
Meal Planning,
Recipes
|
0 Comments »
February 3rd, 2012 at 04:57 am
Why is it the simplest of homemade things can often taste the best? Tonight's meal was an example of that. For dinner I pan-fried some wild Alaskan true cod in just a little bit of e.v. olive oil, lightly seasoned with fresh ground sea salt, fresh ground pepper, and Lawry's seasoning. Along with that we had some Trader Joe's corn, some boiled broccoli, and my homemade cole slaw. Milk was the beverage of choice and the four of us split an heirloom navel orange. It was mostly mine (I had half), but everyone wanted a wedge or two because when I peeled it the aroma it produced was staggering.
My cole slaw is incredibly simple. It takes me a minute and a half to make. Three minutes if I have to shred the cabbage myself, but I generally get the 1 pound bag of pre-shredded from Trader Joe's for $1.29. My dressing is easy, 1/4 cup of organic Canola mayonnaise, 1/4 cup of canola oil (olive oil flavors it too intensely) and 2 tbsp of honey. Stir with a whisk until blended and dump into the cabbage. Mix. Done.
From start to finish dinner took 15 minutes to make and everything was fresh and easy. I love that in a dinner. It was fast because I was organized. First I put on the pan to boil water for the broccoli, then I started the fish cooking. I cut up the broccoli and washed it and dumped the cabbage into a bowl. Then it was time to flip the fish and by then the water was boiling so I put the broccoli on to steam. I turned down the heat on the fish, covered it and mixed up the dressing. I put the corn in a bowl with some butter and salt and put it in the micro for two minutes. I dumped the dressing on the cole slaw, pulled the fish off the heat, returned to the slaw to mix it, then pulled the broccoli. By then the corn was done. Presto chango, dinner in 15.
Faster than driving to get fast food and 100 times healthier. It was about $12 for the whole meal and McDonalds would have been about $25 to feed us. So all around a much more convenient use of time and a better use of money.
Posted in
Meal Planning,
Recipes
|
4 Comments »
January 18th, 2012 at 12:13 am
I am getting bored with my usual repertoire of recipes and though I have spent a couple hours searching for cheap meals that include meat, I still keep running up against a lot of vegetarian recipes. It's like the search engine has been programmed by the beans and lentils industry. Which is fine when that's what you want to eat (or you like them, which I don't), but not so much when you want your beef, pork, eggs, cheese, poultry or fish. So I thought I'd ask, what are your go to and preferrably flavorful recipes that include meat but are also low cost?
Posted in
Recipes
|
11 Comments »
January 6th, 2012 at 03:17 am
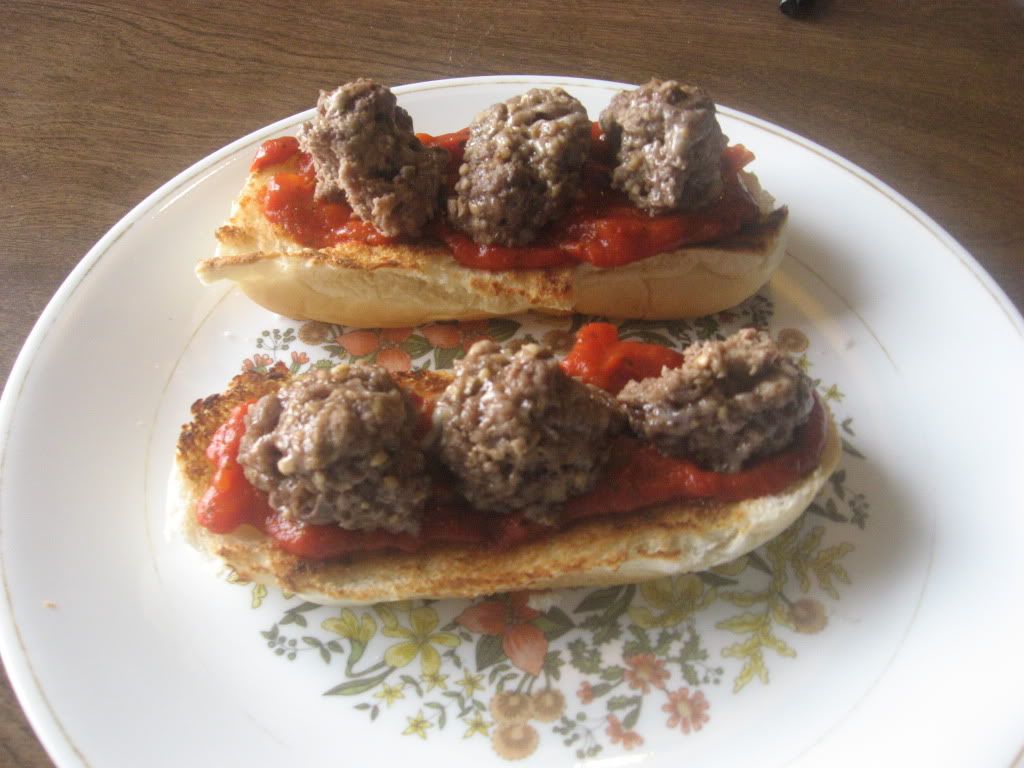
I'm still behind on reading the blogs, but I've caught up to where everyone is talking about meatballs and it gave me a craving so I decided to make up meatball sandwiches tonight, since I had some hotdog buns that were needing to be used up, some leftover homemade spaghetti sauce, and a lot of cheese that has just been sitting there for a while. It's an easy enough recipe to make (and I need easy things right now due to pain). The meatballs themselves are low carb if you want to eat them on their own. I've posted a picture of these before, but realized I never shared the recipe.

Meatballs
1 pound ground beef (or half pound beef and one half pound ground pork)
1/4 cup shredded romano
1/4 cup shredded parmesan
1/4 cup shredded cheddar
2 Tbsp minced garlic
Mix together and make into 1.5 inch diameter meatballs. Cook on high in microwave for five minutes. I use the stack cooker by Tupperware to make these. It's the one with the strainer holes so the fat can drip down beneath, but in a pinch they can go on a bacon cooker.
Warm up your leftover spaghetti sauce (or from a jar) and toast your hot dog buns (just on a hot frying pan is fine, don't try to stick them in a toaster). Spread sauce on each hotdog bun half and then place three meatballs on top. Easy peasy. (I usually make a double batch because DH eats a lot, but I am personally satisfied with one sandwich half and a salad). These meatballs are great with spaghetti or by themselves as well.
Posted in
Meal Planning,
Recipes
|
3 Comments »
December 13th, 2011 at 12:59 am
Last night I assembled some homemade stir-fry kits. These are similar to what you can buy in the store, generally in the Asian section of the freezer aisle, but of course I get to choose the ingredients and make sure that everything is just to my liking.
Because I happened to have 5.5 pound bag of stir-fry veggies on hand I used that, but any fresh veggies cut into strips or any pre-frozen veggies will do. First I will show you how I made my kits and then I will add some recipes for making them from scratch.
First I started with 3.5 pounds of boneless skinless chicken thighs (after shrinkage this will make 3 packets). You can choose white meat if you prefer it. We like dark.

Grill chicken pieces or cook in a pan. I used a George Foreman grill. I seasoned with salt and pepper only, however much you'd normally put on. Then I cut the chicken into bite sized pieces.

Once the chicken has cooled, place approximately 1 pound in a baggy. You can use a freezer baggy, but I used sandwich ones because they will be placed in a larger freezer baggy at the end of assembly.

Put two cups of your vegetables into a baggy.

Put one baggy of chicken and one baggy of veggies into a gallon size freezer bag.

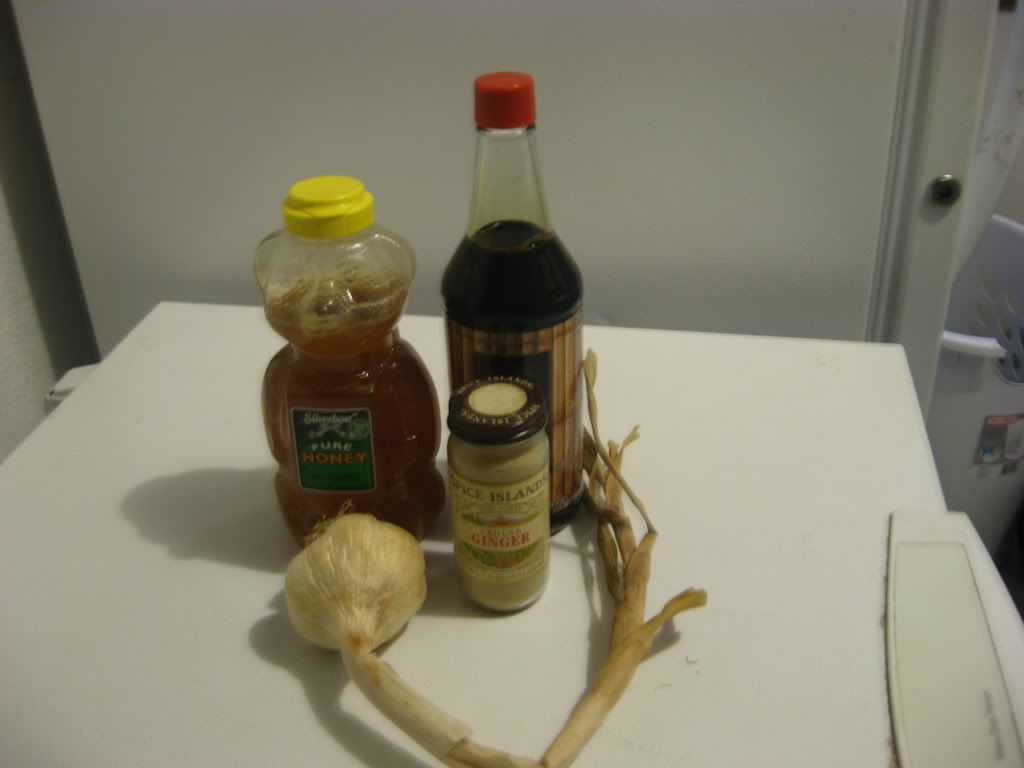
For your sauce you have a couple of choices. For a dark sauce combine 1 cup of soy sauce (I use a gluten free, low sodium, no preservatives type), 1/4 cup of honey (or 1/4 cup brown sugar), 1 inch of fresh ginger peeled and grated (or 1/4 cup ground ginger), and 2 large cloves of garlic peeled and minced (or 1/4 tsp garlic powder or 1/2 tsp dried garlic). I usually use fresh on the garlic and ginger, but I was out of fresh ginger. I had some leftover sesame seeds from the last time we got takeout so I dumped a tablespoon of those in, too. For a light sauce use chicken broth instead of soy sauce.

Combine ingredients for sauce in a bowl and whisk together. Whisk the sauce for each packet by itself. If you combine it all together you may not have an even distribution of ingredients as the honey can make things sluggish. You can either dump this into a baggy or pour into a 1.5 cup plastic container. Freeze the sauce upright before placing in the gallon size Ziploc with chicken and veggies. Your kit is complete. I don't have a photo of this final step as my camera batteries died.
When you are ready to make this, first take out the sauce and put it in a hot water bath to thaw. It probably won't be completely frozen if you use honey. Heat oil in a wok or deep saute pan on medium high heat. I use peanut oil or olive oil depending on what I have. When oil is hot add the frozen chicken packet and stir for 3 to 5 minutes until chicken is thawed and hot. Add frozen veggie packet and stir for about 3 to 5 minutes until veggies are thawed and hot. Your sauce should now be thawed. Dump into pan and stir for one minute. (If you want a thicker sauce you can add a tbsp of corn starch now, but I don't bother). Turn heat down to low and cover, simmering for 2 minutes. It's done.
For my family one of these stir-fry kits would be enough to feed me, my 15 year old daughter, and my 11 year old son. If DH is home I would make 2 packets and there might be a little left over for his lunch the next day.
Other recipes to prepare the same way:
Pork Stir Fry
1 pound cheap pork loin or boneless chops, grilled (s&p) and cut into bite sized pieces
4 green onions
6 ounces snow peas
2 medium carrots, peeled and cut thin on the diagonal
8 ounces fresh or canned bamboo shoots
Sauce:
1 cup low sodium, gluten free soy sauce
� cup brown sugar
1 inch piece of fresh ginger, peeled and grated
2 garlic cloves, peeled and minced
1/8 tsp red pepper flakes
Beef and Peppers Stir-Fry Kit.
1 pound chuck steak, grilled (s&p) and cut into bite sized pieces
1 white onion cut into strips
2 cups of bell pepper strips (red, yellow, orange)
Sauce:
1 inch piece of fresh ginger, peeled and grated
1 cup low sodium, gluten free soy sauce
� cup honey
2 tbsp sesame seeds
Chicken and Vegetables Stir-Fry Kit
1 pound boneless skinless chicken thighs, grilled (s&p) and cut into bite sized pieces
2 cups mixed vegetables (snow peas, carrots cut on the diagonal, broccoli, cauliflower, celery cut on the diagonal, 1 can water chestnuts)
1 regular yellow onion cut into strips
Sauce:
1 inch piece of fresh ginger, peeled and grated
1 large clove garlic, peeled and chopped
1 cup low sodium, gluten free soy sauce
� cup honey
Posted in
Cutting Expenses,
Meal Planning,
Recipes
|
8 Comments »
|
 I live, write, and garden in the PNW with my husband of 30 years, disabled daughter, autistic son, and my 85-year-old mother. We have paid off $250,000.00 worth of debt (if you include the interest) in the last fifteen years and as of 6/12/2020 are 100% DEBT FREE!!!!